Published on 24 July 2019 Enterprise IT, Media, Entertainment & Creative
Bitmovin provides a cloud-based API for encoding, analytics and HTML5 player for MPEG-DASH and HLS. The premise behind the encoding service is parallel chunk-based transcoding which can scale to meet your needs.
The Bitmovin encoder is a great solution for very fast encoding of media formats suitable for web delivery. If you have or are considering implementing a Vidispine API-based MAM, then this blog shows how to configure the Vidispine API to use the Bitmovin encoding API.
OVERVIEW
This integration aimed to see if we could add Bitmovin encoding to a Vidispine MAM so the Vidispine MAM could use it as an external transcoder.
For this integration we used several Amazon Web Services (AWS) services to integrate the Vidispine APIS with the Bitmovin encoding API, similar results can be achieved with different architectures. (see diagram below 'Integration Architecture')
Integration Architecture
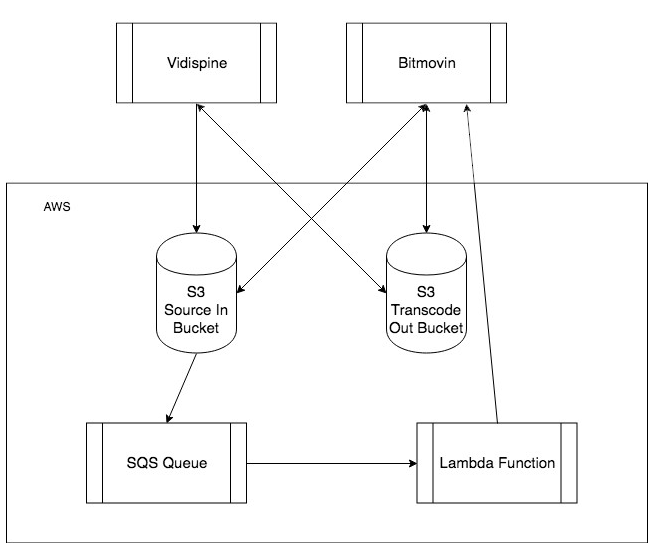
This integration consists of 3 parts:
- Setting up the AWS services consists of creating two S3 buckets, an SQS queue and a Lambda function.
- Configuring the Bitmovin encoder. This entails configuring storage and creating encoding profiles.
- Adding an external transcoder to the Vidispine MAM.
WORKFLOW
Vidispine Integration with Bitmovin as an Extern Transcoder
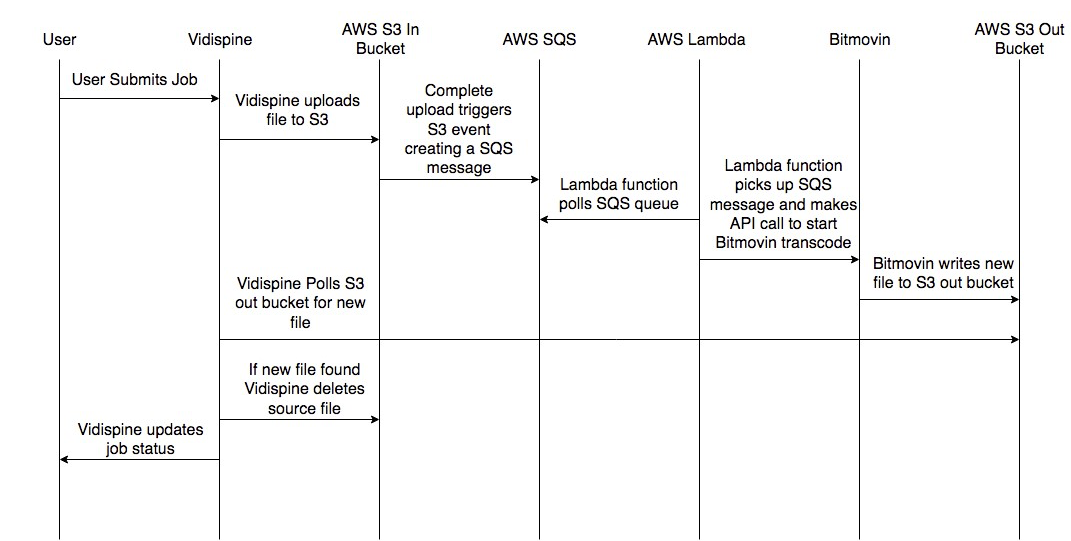
The diagram above ('Vidispine Integration with Bitmovin as an External Transcoder') outlines the happy path of this workflow.
- A user triggers a job.
- The Vidispine MAM starts a new transcode job, uploads the items source file to the Source in Bucket.
- Once the file has finished uploading an S3 event is triggered and adds a message to the SQS queue.
- This SQS message is picked up by a Lambda function which creates the Bitmovin encoding resource, adds the media streams, sets the muxing type and starts the encoding job all via API calls.
- Bitmovin encoder creates the new file and moves it to our Transcode Out Bucket.
- The Vidispine API has been polling the Transcode Out Bucket, waiting for a file to appear that meets the regex pattern we configured it to wait for.
- Once the file from the Bitmovin encoder arrives it cleans up after itself deleting the source file from the Source S3 Bucket.
- The Vidispine API then completes the transcode job setting its status to complete.
AWS Services
This diagram highlights how AWS’s services form the core of the integration, here is a breakdown of how each service is being used.
S3
We use two S3 buckets, the first to provide the Bitmovin encoder with source files and the second for the Bitmovin encoder to move the transcoded files to.
The S3 bucket which is used for source files also provides an important secondary role, once a file has been successfully uploaded an S3 event is triggered. This bucket has been configured to POST an SQS message to our SQS queue.
Information on how to configure S3 event notifications is available at: https://docs.aws.amazon.com/AmazonS3/latest/dev/NotificationHowTo.html
SQS
We are using an SQS queue as our job queue, whenever a file is uploaded to the Source File S3 bucket an SQS message is added to this queue and is consumed by a Lambda function which polls this queue for new jobs.
SQS docs are located at https://docs.aws.amazon.com/sqs/index.html#lang/en_us
Lambda
Our Lambda function polls the SQS queue for new messages, once it picks up a message, it will then use the data in that message to make the API calls which are required to create and start a Bitmovin encode job.
Lambda docs are located at https://docs.aws.amazon.com/lambda/index.html#lang/en_us
Configuring Bitmovin
Getting Started
For this integration we need to configure the Bitmovin encoder to use the two S3 storages that we have created in AWS. This can be done via the Bitmovin UI or via IP requests. But first we need to create an account and get a Bitmovin API key.
This guide explains how to do this:
http://bitmovin.com/docs/encoding/quickstarts/get-started-with-the-bitmovin-api#introduction
Setting your Input and Output Destinations
Next, we have to configure the input and output destinations that we want to use. The Bitmovin docs explain how to do this.
Inputs: http://bitmovin.com/docs/encoding/api-reference#/reference/encoding/inputs
Outputs: http://bitmovin.com/docs/encoding/api-reference#/reference/encoding/outputs
Creating your Codecs
The final step in the Bitmovin encoder config is to create the codecs that you want to use the API docs explain how this is done:
http://bitmovin.com/docs/encoding/api-reference#/reference/encoding/codec-configurations
Adding the Bitmovin Encoder to Vidispine as an External Transcode
Now that we have configured the Bitmovin encoder and our AWS services we can setup the Vidispine external transcoder by making the following API call to Vidispine:
POST /resource/externalTranscoder/
Content-Type: application/xml
<ResourceDocument xmlns="http://xml.vidispine.com/schema/vidispine">
 <externalTranscoder>
 <source>s3:///external-transcoder.aws.amazon/source/</source>
 <destination>s3:///external-transcoder.aws.amazon /destination/</destination>
 <shapeTag>external-format</shapeTag>
 <timeout>60000</timeout>
 <regex>.*demo.*</regex>
 </externalTranscoder>
</ResourceDocument>
More information on how to do this can be found at: http://apidoc.vidispine.com/latest/system/integration/external-transcoder.html
How to Create a Bitmovin Encode Job
To create an encode job in Bitmovin you need to make a series of API calls. These API calls are being made by the AWS Lambda function once it has parsed an SQS message.
For this integration we are doing a simple transcode from XDCAM 422 to the MP4 profile we created in Bitmovin, to do this we need only need to make four API calls:
How to create the encoding package
POST https://api.bitmovin.com/v1/en... response from this request will include the encodingId (for this example its 55c7bf89-f46d-4d05-8658-05e974135416 and is used in the subsequent URI’s)
Docs: https://bitmovin.com/encoding-documentation/bitmovin-api/#/reference/encoding/encodings/create-encoding
Add your required streams
POST: https://bitmovin.com/encoding-documentation/bitmovin-api/#/reference/encoding/encodings/add-stream
Specify" class="redactor-autoparser-object">https://api.bitmovin.com/v1/en... which file format you want to create, in our case it’s an MP4
We" class="redactor-autoparser-object">https://api.bitmovin.com/v1/en... can now trigger a transcode from the Vidispine MAM and the Bitmovin encoder will process the file and create it in our S3 bucket.
For more information about the API calls I use for this integration please read the Bitmovin API docs:
https://bitmovin.com/encoding-documentation/bitmovin-api/#/reference/encoding
Conclusion
By integrating the Vidispine MAM with Bitmovin’s encoder you are able to make use of a powerful transcoding engine without having the overheads that traditionally come with running a transcoding farm. You also get the flexibility of being able to use the Bitmovin Encoder to transcode items that have been ingested into Vidispine’s MAM.
Contact us for more information or to see how we can help your Media Asset Management.
* This field is required